Repair Delaminated Shipping Container Floors
Share
Shipping containers are valued for their durability, but they aren’t immune to wear and tear. One common issue, especially in older or heavily used containers, is floor delamination.
If you’ve noticed soft spots, peeling surfaces, or uneven flooring in your container, you’re likely dealing with delamination. Fortunately, repairing a delaminated floor is a manageable task that doesn't necessarily require replacing the entire floor. This guide will walk you through the process, tools, and techniques needed to restore your container floor safely and effectively.
What Is Floor Delamination?
Delamination occurs when the layers of plywood that make up a container’s floor begin to separate. Standard shipping container flooring is constructed from marine-grade plywood that is bonded with waterproof adhesives. Over time, exposure to moisture, temperature fluctuations, and heavy loads can degrade the adhesive, causing the layers to come apart.
Common signs of floor delamination include:
-
Soft or spongy spots underfoot
-
Bubbling, peeling, or flaking surface layers
-
Visible gaps between plywood layers
-
Flexing or creaking sounds when pressure is applied
Left untreated, delamination can lead to mold, further damage, or safety issues.
Tools and Materials Required
To complete a floor repair, you’ll need the following tools and supplies:
-
Circular saw or oscillating multi-tool
-
Pry bar and claw hammer
-
Measuring tape and straight edge
-
Marine-grade plywood (typically 1.1" or 28mm thick)
-
Construction adhesive or wood epoxy
-
Deck screws or self-tapping screws
-
Wood filler or epoxy filler
-
Sandpaper or power sander
-
Personal protective equipment (gloves, goggles, dust mask)
Optional: anti-mold treatment and industrial-grade sealant for added protection.
Step-by-Step Instructions for Repairing a Delaminated Floor
1. Assess the Damage
Begin by thoroughly inspecting the entire floor. Walk across the surface and note any areas that feel soft, sound hollow, or appear warped. Mark each area that requires attention. Depending on the extent of the delamination, you may only need to replace a small section.
2. Remove the Affected Area
Use a circular saw or oscillating tool to carefully cut out the damaged portion of the floor. Be sure to set your blade depth to match the thickness of the plywood to avoid cutting into the steel framing or structural members below. Make clean, square cuts to simplify the fitting of the replacement piece.
3. Clear Out Debris and Prepare the Surface
Once the delaminated section is removed, use a pry bar to lift any remaining loose material. Clean the exposed surface thoroughly, removing any dust, debris, or moisture. If mold is present, treat the area with a mold-resistant solution and allow it to dry completely.
4. Measure and Cut the Replacement Panel
Using the dimensions of the cut-out section, measure and cut your replacement panel from marine-grade plywood. Test the fit before applying adhesive to ensure it sits flush with the surrounding floor and aligns with any structural support beams.
5. Install the New Plywood Section
Apply construction adhesive or a strong wood epoxy to the bottom of the new panel and the underlying surface. Position the panel in place, ensuring proper alignment, and secure it using deck screws or self-tapping screws. Screws should be evenly spaced and countersunk slightly below the surface.
6. Seal the Edges and Smooth the Surface
After the replacement panel is installed, fill any seams or gaps with wood filler or epoxy filler. Once the filler has cured, sand the area smooth to create a uniform surface. This step is especially important if you plan to install flooring or apply a protective coating.
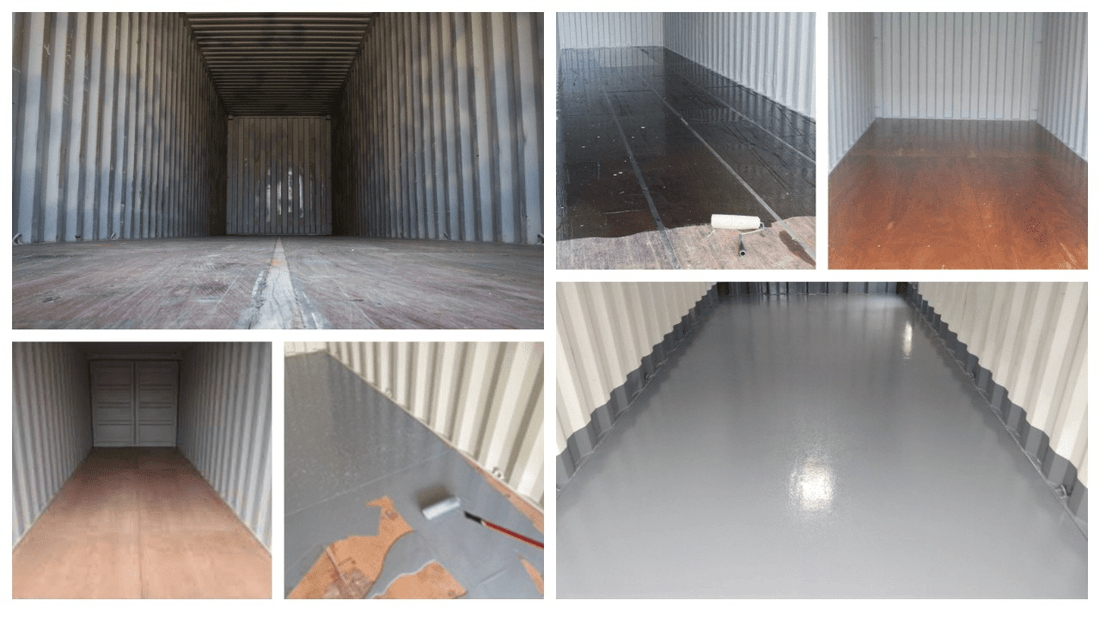
7. Optional: Apply a Sealant or Coating
To extend the life of your repair and prevent future delamination, consider sealing the floor with an industrial-grade sealant. This protective layer helps guard against moisture intrusion, foot traffic, and environmental wear.
Tips for Preventing Future Delamination
While repairing a floor is relatively straightforward, preventing delamination from recurring is equally important. Here are a few best practices:
-
Ensure proper ventilation inside the container to reduce humidity buildup.
-
Elevate the container off the ground using railroad ties or concrete blocks for better air flow.
-
Apply protective coatings or floor mats in high-traffic areas.
-
Conduct regular inspections for leaks, condensation, or structural shifts.
Repairing a delaminated floor in a shipping container is a practical and cost-effective way to extend the lifespan of your unit. With the right approach and the right tools, even non-professionals can perform this repair safely and efficiently. Whether you're maintaining a container for storage, converting it into a workspace, or building out a living space, addressing floor issues promptly ensures the structure remains functional and secure.
Fill out the form below for a free shipping container quote from USA Containers: