Skip to product information
1 of 2

Power & Utility Starter Pack - Shelving + Lighting + Power

Power & Utility Starter Pack - Shelving + Lighting + Power

Regular price $291.95 USD
Regular price $323.39 USD Sale price $291.95 USD
Sale Sold out
Kevin B.

We used this pack to turn a basic storage container into a fully functional ranch workshop.

In stock. Fast free shipping delivered in 2-5 business days

Complete Project Solution

Easy-Hang Container Shelving

High-Strength Construction

Solar-Powered Container Efficiency

Universal Fit

ISO Container Compatibility

Description

Bring Storage, Power & Light to Any Container — Without an Electrician

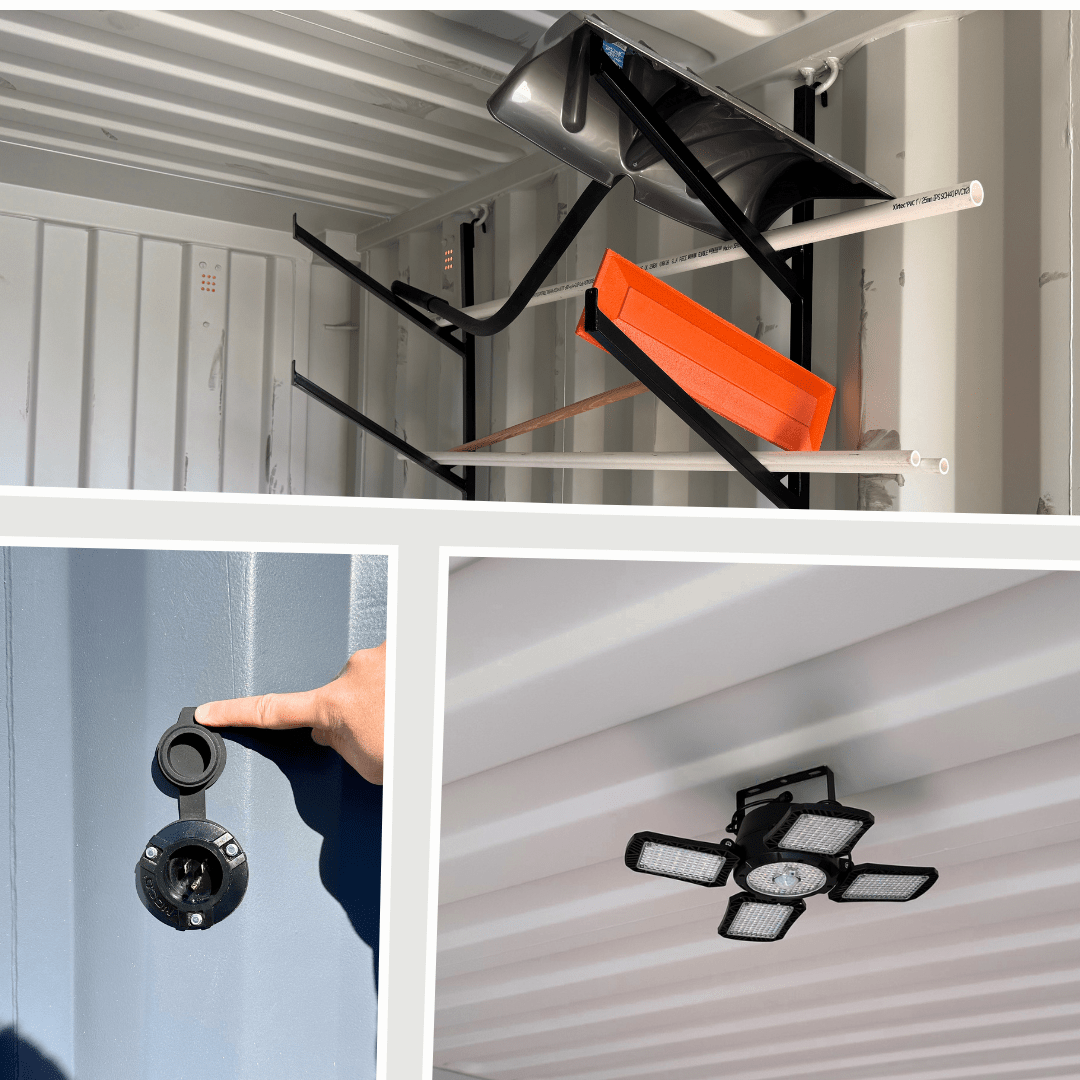
The Power & Utility Starter Pack gives you basic shelving + electrical access + interior lighting using safe, jobsite-rated accessories.

This bundle is ideal for:

  • Workshops
  • Tool storage
  • Ranch containers
  • Mobile offices
  • On-site contractor storage

WHAT’S INCLUDED

1. Power Outlet Splitter

  • Convert one outlet into multiple ports
  • Run fans, lights, and chargers at the same time
  • Brings electricity into your container
  • Heavy-duty construction

2. 3 Tier Pipe Rack Shelving

  • D-Ring Compatible (Holds up to 1100 lbs per pair)
  • Pipe Racks Dimensions: 19" (W) x 66.2" (H)
  • Versitile storage options made easy
  • Instant storage - no drilling or cutting required

3. Fan Shaped Solar Light

  • Wireless, bright interior illumination
  • No wiring or power needed
  • Easy Installation

Key Benefits

  • Power multiple devices from one connection
  • Add lighting instantly
  • Organize tools + cords
  • Perfect for entry-level container upgrades
  • Works in every type of shipping container

Bundle Value

Retail: $323.39
Bundle Price: $291.95
You Save: $31.44

How to use

Fan-Shaped Light Installation

Step 1: Mount the Solar Panel

  1. Head to the outside of your container and choose a spot on the roof or high up on the side wall that gets unobstructed, direct sunlight all day long.
  2. Use the included mounting hardware to secure the exterior solar panel bracket to the container's steel skin.
  3. Attach the solar panel to the bracket so it faces upward toward the sun for optimal daily charging.

Step 2: Route the Power Cable

  1. Drill a small pass-through hole into the side wall or roof of your container right near your solar panel.
  2. Feed the attached power wire from the solar panel down through the hole and into the interior of the container.
  3. CRITICAL STEP: To keep your container 100% waterproof, apply a generous bead of exterior-grade silicone sealant completely around the drilled hole to block out rain and morning condensation.

Step 3: Hang the Fan-Shaped Light

  1. Step inside the container and pick a central location on the ceiling or structural ribs to maximize your light coverage.
  2. Use the included mounting bracket to hang the fan-shaped lighting fixture flush to the ceiling.
  3. Plug the solar panel's drop-down wire directly into the receiver socket on the light fixture.

Pro-Tip: While designed as an indoor overhead light, the rugged design means you can also mount this fixture on the outside of your container to illuminate an outdoor loading area if you prefer.

Power Outlet Installation - Step 1: Cut the Access Hole

  1. Select an accessible exterior location on your shipping container wall near where you plan to draw power.
  2. Equipping a power drill with a 2-inch hole saw (circle cutter), drill straight through the steel container wall to create a clean pass-through opening.
  3. Deburr and smooth out any sharp edges around the newly cut 2-inch circle.

Step 2: Feed and Align the Socket

  1. From the outside of the container, feed the integrated power wire attachment tail-first completely through the 2-inch hole and into the container interior.
  2. Push the power inlet housing forward until the integrated rubber waterproofing gasket sits flat and flush against the exterior steel container wall.
  3. Level the socket face vertically to your exact preference.

Step 3: Fasten and Tighten the Hardware

  1. Locate the three pre-molded mounting holes surrounding the perimeter of the inlet housing.
  2. Using a power drill, drive three heavy-duty self-tapping screws directly through the mounting holes and into the container steel.
  3. CRITICAL STEP: Tighten the three screws completely snug. This firmly compresses the built-in rubber face gasket against the corrugated steel wall, generating an airtight, completely waterproof seal that blocks out rain, moisture, and pests without needing extra caulk.

Step 4: Hook Up Your Power Source

On the Outside: Flip open the protective spring-loaded exterior cover, insert any standard household extension cord running from your primary power source, and close the outer shroud as far as possible over the connection.

On the Inside: Walk into the container and locate the wire attachment you fed through in Step 2. You can now immediately plug in any traditional 3-prong device, power strip, or tool directly into this internal line.

Shelving Brackets Installation - Hook the Brackets Into the D-Rings

  1. Locate the pre-installed D-rings along the upper interior walls of your shipping container.
  2. Take your shelving brackets and simply hook the top of each bracket directly into the D-rings. No drilling or hardware is required.
View full details

Shelving. Lighting. Power. Every Container Needs This

Bundle

The parts you need for your shipping container project

Turn Walls Into Storage

Simple hanging design installs quickly using existing container points

Durability

Engineered for superior structural integrity and reliability

Solar Powered

Uses solar energy for reliable off-grid operation

Versatility

Fits containers, trailers, trucks, and storage units with ease

Built for Containers

Compatible with most standard ISO shipping containers

What Our Customers Say

  • Kevin B.

    We used this pack to turn a basic storage container into a fully functional ranch workshop.

  • Jim C.

    I received my brackets quickly and they worked great! Well made and I like the fact they hang from the wall and there are not any Legs down to the floor

  • Austin R.

    This bundle is the perfect entry-level upgrade for our mobile jobsite office. Getting the 3-tier shelves, multiple power ports, and a wireless solar light all in one package saved us a ton of time and money.

  • Laura G.

    I love that the pipe rack shelving hooks right into the container's existing D-rings without any drilling or cutting.

  • Randy C.

    The heavy-duty power splitter lets us run our tools and charging stations simultaneously from a single extension cord connection.

1 of 5

Questions About Products?

Whether you need more details, have a specific use case in mind, or just want to make sure you're choosing the right accessory — submit your question below and a member of our team will get back to you shortly.