Skip to product information
1 of 4

Powered Shipping Container Wall Vent

Powered Shipping Container Wall Vent

Regular price $175.99 USD
Regular price Sale price $175.99 USD
Lisa S.

Well worth the effort it takes to install these, no more rain IN the container from moisture!

Buy More Save More:

In stock. Fast free shipping delivered in 2-5 business days

Solar-Powered Container Efficiency

High-Airflow Ventilation Design

Container Condensation Reduction

Easy Shipping Container Installation

Commercial-Grade Container Accessories

Corrosion-Resistant Steel Construction

Description

Solar & Multi-Powered Ventilation Solution

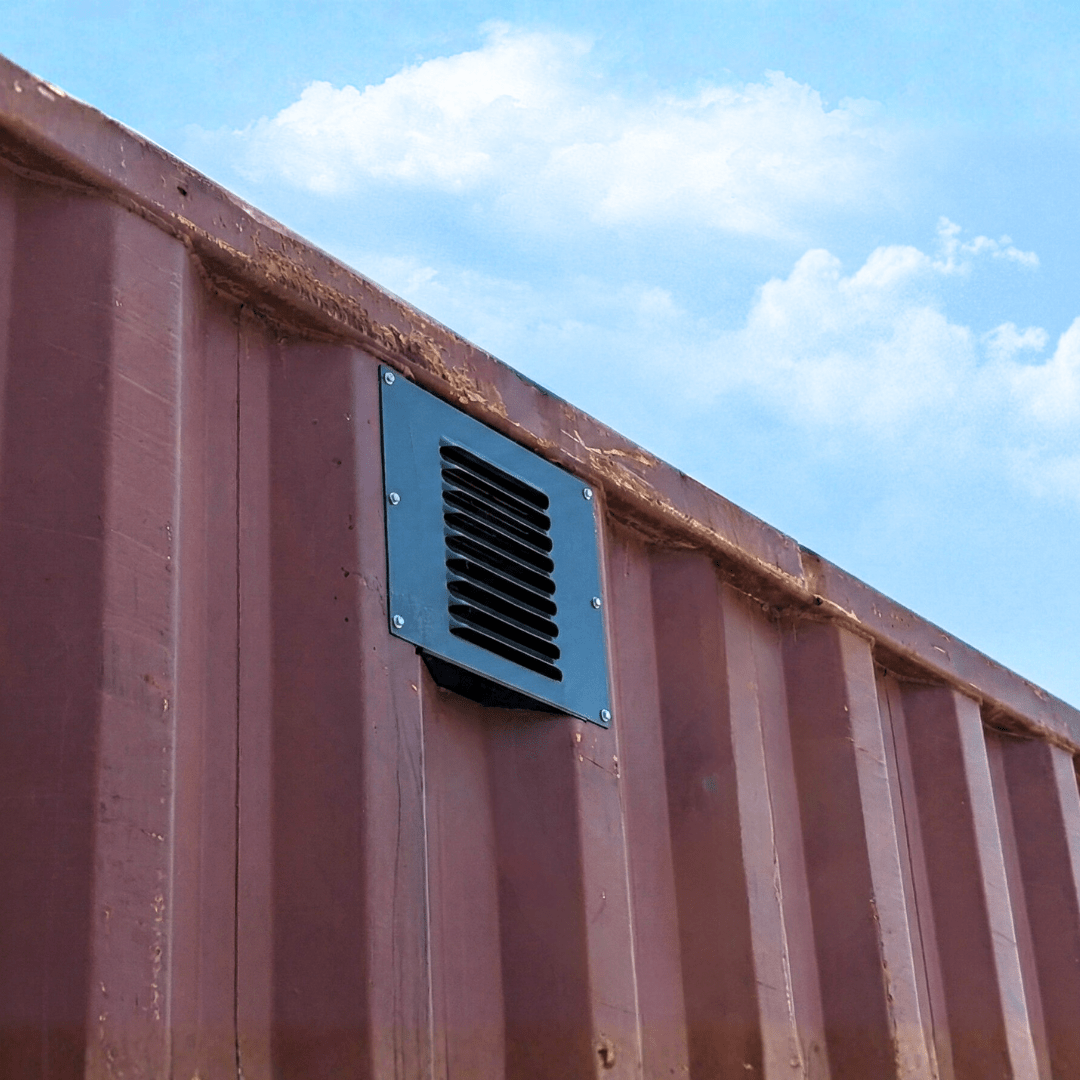
Designed specifically for shipping containers, container sheds, and storage containers, this heavy-duty wall-mounted vent fan actively removes heat, moisture, and stale air—helping protect tools, inventory, and equipment year-round.

Available in two power configurations, this vent gives you the flexibility to choose pure solar operation or a multi-powered setup that runs day or night.

Choose Your Power Option

Multi-Powered Container Wall Vent

  • Best for users who want 24/7 airflow regardless of sunlight.
  • Runs on solar power when sunlight is available
  • Automatically switches to AC power when sunlight is weak or unavailable
  • Includes AC-DC power adapter
  • Built-in 3-position switch:
    Solar → Off → AC/DC
  • Ideal for containers used as workshops, storage units, or occupied spaces

Solar Powered Container Wall Vent

  • Best for off-grid or zero-electric setups.
  • Powered entirely by the included solar panel
  • Operates automatically when sunlight is present
  • No external power required
  • Perfect for remote containers, job sites, and passive ventilation needs

Why Install a Container Wall Vent?

  • Actively removes trapped heat in summer
  • Helps reduce condensation and moisture buildup in winter
  • Improves air quality inside sealed steel containers
  • Extends the life of tools, equipment, and stored goods
  • Simple plug-and-play wall installation

Key Features

  • Efficient 10W Monocrystalline Solar Panel
  • Up to 120 CFM airflow for effective ventilation
  • Brushless DC motor – low noise, long lifespan (5+ years)
  • Powder-coated galvanized steel housing for outdoor durability
  • Integrated insect screen prevents pests and nesting
  • Adjustable solar panel mounting bracket
  • Designed specifically for shipping containers & sheds

Technical Specifications

  • Airflow: Up to 120 CFM
  • Vent Opening / Duct Diameter: 150mm
  • Overall Dimensions: 300 × 201 mm
  • Solar Panel: 10W Monocrystalline
  • Solar Cable Length: 2 meters
  • Motor: Brushless DC (5+ year lifespan)
  • Housing: Galvanized steel, powder-coated
  • Fan Blades: PBT material
  • Switch (Multi-Powered Version): Solar / Off / AC-DC
  • AC-DC Adapter: Included with Multi-Powered version

What’s Included

  • Wall-mounted vent fan assembly
  • Solar panel with mounting bracket
  • 2m solar panel cable
  • Insect screen (pre-installed)
  • AC-DC power adapter (Multi-Powered version only)

Ideal For

  • Shipping containers
  • Container workshops & offices
  • Storage containers
  • Container sheds
  • Off-grid or remote installations

Pair this with a solar roof vent up high for the best cross-ventilation, or see all container vents, including passive louvered options.

How to use

Step-by-Step Installation

Step 1: Trace the Cutout Template

  1. Position the exhaust vent on the exterior wall of the container. Line it up as high and as close to the roof as possible.
  2. Center the unit so that the side mounting edges align properly with the flat ribs (corrugations) of the container wall.
  3. Use a marker to draw a stencil/cut line around the perimeter of the vent body.
  4. Pro-Tip: The top and sides of this cut are straight, but tracing carefully around the overlapping profile of the container's metal ribs ensures a snug fit. It is better to cut slightly small, as you can grind it out later for a tighter fit.

Step 2: Cut out the Vent Opening

  1. SAFETY FIRST: Put on proper eye protection and heavy-duty work gloves before cutting into the steel.
  2. Use an angle grinder equipped with a metal cutting disc (cut-off wheel) to carefully cut along your traced template lines.
  3. Switch to a grinding disc to clean up any rough edges or burrs, and test-fit the vent until it slides into the cutout opening tightly.

Step 3: Mount and Secure the Vent

  1. Push the exhaust vent fully into the cutout opening so it sits flush against the container wall.
  2. Align the mounting holes with the flat sections of the container's corrugation.
  3. Using a power drill and heavy-duty self-tapping screws, drill directly through the vent frame and the container steel to lock the unit firmly in place. Tighten the screws until they are completely snug.

Step 4: Waterproof and Seal

  1. Step inside the container and inspect the installation layout. Check for any visible sunlight poking through the seams around the vent housing.
  2. CRITICAL STEP: To ensure the installation is entirely waterproof, apply a generous layer of standard exterior-grade silicone sealant or caulk around the exterior and interior seams of the vent to prevent rain or moisture from leaking in.

Step 5: Connect Power Source

  1. Select your preferred power method. You can plug the exhaust vent directly into an electrical cord, connect it to the included solar panel, or connect both simultaneously.
  2. System Tip: If you connect both, the integrated motor is smart enough to automatically select and draw from whichever power source is currently delivering the most energy.
View full details

Reduce Heat & Condensation In Your Shipping Container

Solar Powered

Uses solar energy for reliable off-grid operation

Improved Airflow

Promotes consistent airflow for improved container conditions

Moisture Reduction

Helps reduce interior moisture buildup, mold, and mildew risks

Convenience

Simple bolt-on or mount-on installation with minimal tools required

Professional Grade

Designed for professional shipping container applications

Built to Last

Durable materials help resist rust and long-term outdoor wear

What Our Customers Say

  • Lisa S.

    Well worth the effort it takes to install these, no more rain IN the container from moisture!

  • Kirk C.

    Installed both of these down low towards the back of the 40′ container. With the doors open, I can absolutely tell a huge difference in ventilation. Soon I will install a rooftop solar fan and not need to open the doors. The construction of these vents is top notch and with a little caulk to seal everything up, they should be good for a very long time. If you are going to use the pop rivets, which is recommended, get yourself a pop rivet tool that chucks in a drill. I have a high quality handheld tool, good grip strength, and it was very difficult. So get a good pop rivet tool.

  • Joe W.

    These vents are very well made and easy to install using the supplied template.

  • Awana K.

    Fast shipping, well package, clear instructions. You can also look at video website/YouTube.

  • Leo A.

    I used these before and they are great. This is the second time buying some

  • Jackson W.

    These vents are very well made and easy to install using the supplied template.

  • Aaron C.

    Put 4 vents in cone. Building to try and get some air flow!! Sure is hot in this Texas heat!!

  • Andrew M.

    If you're looking to protect equipment in a container shed, this is the vent to get.

  • David P.

    Great product, perfect for my Conex container, this is a must have for condensation inside the container.

  • Tanner D.

    Worth the money. Helps take the intense heat out of my conex box, very pleased

  • Daniel M.

    Awesome well built easy to install vents for shipping containers. Massive improvement in air flow.

  • Don B.

    I seen other C cans that where sweating inside, so far they seem to keep the ventilation up very well. Watch Youtube for information on the install, it made it very easy.

  • Frank B.

    Fast delivery, easy to follow installation guide lines, great ventilation for my container…Thanks

  • Garrett R.

    This is the second set of these vents I have installed in my 20′ sea crates. In the three years I have used the first crate, the temperature inside has never been a problem. This spring I got a second sea crate and immediately noticed that it was way warmer inside that my first one. I ordered the same vents and installed them today, a sunny warm day. Immediate difference inside. The temperature moderated fairly quickly. These are pretty expensive but are worth it. They are shipped quickly, are well packaged and have very good installation instructions.

  • Mike K.

    I had high expectations for the product based on price. I was not disappointed. The plastic inside and aluminum outside cover makes them very sturdy. They fit perfectly between the corrugated metal leaving enough room for the flange. I purchased 2 packages (4) and each package had an extra pop rivet. I used one full tube of silicone sealant for all 4 vents. I put a bead on both sides of the container over the holes I drilled and then the top and bottom of the vent. They should offer a tub of sealant for each package. That would make the kit 100 % ready to install.

  • Sloan W.

    It wasn’t too hard to install and works well for venting my air conditioner. It’s strong and attractive.

  • Jeff G.

    I bought the 45s with the screen and they installed perfectly. I took their advice and used the provided rivets. This side install was much better than cutting into the roof and risking roof leaks.

1 of 17

Frequently Asked Questions

What does a powered wall vent do that a passive vent does not?

A powered wall vent actively moves air through your container using a fan, rather than relying on natural airflow like a passive louvered vent. That active movement is much more effective at cutting condensation and heat in a sealed steel container, because it forces stale, humid air out instead of waiting for the weather to move it. For containers that trap heat and moisture, an active vent makes a noticeable difference.

Is the wall vent hard to install?

No, it is designed to be DIY-friendly. It mounts to the container wall and is built for a straightforward installation without specialized skills.

Is it durable enough for outdoor use?

Yes. The vent is built to be durable and weatherproof, which it needs to be since it mounts on the container's exterior wall and is exposed to rain, sun, and temperature swings. It is made to keep moving air reliably while standing up to the elements over time.

Can I pair this with other vents?

Yes, and it is a smart way to ventilate. Using this powered wall vent as the active exhaust alongside passive intake vents creates cross-flow airflow, fresh air drawn in low while the powered vent pushes hot, humid air out, which ventilates a container far more effectively than any single vent on its own.

Questions About Products?

Whether you need more details, have a specific use case in mind, or just want to make sure you're choosing the right accessory — submit your question below and a member of our team will get back to you shortly.