Skip to product information
1 of 3

Shipping Container Rectangular Vents - 2 Pack

Shipping Container Rectangular Vents - 2 Pack

Regular price $206.99 USD
Regular price Sale price $206.99 USD
Awana K.

Fast shipping, well package, clear instructions. You can also look at video website/YouTube.

Buy More Save More:

In stock. Fast free shipping delivered in 2-5 business days

Fit-Tested Container Design

High-Strength Construction

Commercial-Grade Container Accessories

Weather-Resistant Container Design

Easy Shipping Container Installation

High-Airflow Ventilation Design

Description

Keep condensation under control! This pack of two vents will help manage temperate and humidity within your shipping container for storage

  • Engineered to be installed anywhere on shipping container side walls, end walls or doors from floor to ceiling. Fits: 8', 9', 10', 20', 40', 45', 48', 53' corrugated and smooth wall shipping containers
  • High UV Resistant Polypropylene and Laser Cut Aluminum Frame will never rust!
  • 45 Sq. In. Net Free Area, 8 3/4 inch x 14 inch Rough Opening

Maximize airflow with this uniquely designed for containers vent 2 pack system. Order now for FREE Shipping nationwide!

This Shipping Container Vent is engineered to be installed anywhere on shipping container side walls, end walls or doors - from floor to ceiling.

Other vent designs can only be installed tight up against the top rail of containers and stick out up to 4" causing the container doors to damage the vents when they fully swing open.

 Other vent designs that protrude add width to a shack or sea can which may require the need for over width permits to transport.

Rivets and self-tapping screws are also included (we recommend using rivets).

Minimum two vents required per container for temperature & moisture control in temperate climates. Four vents per container suggested in tropical climates. For HAZMAT ventilation, two vents installed high and two vents installed low is suggested. Customer's responsibility to ensure OSHA compliance when storing hazardous materials.

Eliminate moisture and excess heat with our state of the art computer modeled design. Made with highly durable Polypropylene and Aluminum,  will never rust!

The variables inside a shipping container are always changing. When the combination of those variables create an environment prone to humidity, condensation will happen.

Want active airflow instead of passive? Step up to a solar roof vent or powered wall vent. Browse all shipping container vents.

How to use

Step-by-Step Installation

Step 1: Trace the Cutout Template

  1. Take the provided stencil and place it against the exterior wall of your shipping container at your desired location.
  2. Use a marker to trace clearly around the stencil lines to map out your cut area.

Step 2: Cut Out the Vent Opening

  1. SAFETY FIRST: Put on your protective gear (eye and hand protection) before operating heavy tools.
  2. Use an angle grinder equipped with a metal cutting disc (cut-off wheel) to carefully cut out the traced section of the container wall.
  3. Test-fit the louver gable vent by sliding it into the cutout hole. It should be a very snug fit to minimize the amount of sealing needed later.

Step 3: Drill the Mounting Holes

  1. Push the vent tightly into the cutout opening so it sits flush against the container wall.
  2. Using a power drill, drill matching holes directly through the pre-marked holes along the outer edge of the vent frame and straight through the container's steel skin.
  3. Drill all 10 mounting holes around the perimeter of the frame.

Step 4: Rivet the Vent to the Container

  1. Grab your rivet gun and the provided mounting hardware (pop rivets).
  2. Place a rivet into the gun, insert it into one of the drilled holes, and pop it into place.
  3. CRITICAL STEP: Firmly apply inward pressure against the vent frame while pulling each rivet. This compresses the vent's built-in waterproof lining against the steel wall, ensuring an airtight, heavy-duty contact seal.
  4. Repeat this process for all 10 holes until the vent is completely fastened.

Step 5: Seal for Waterproofing

  1. Take your silicone sealant/caulk and apply a clean bead completely around the exterior seams of the vent frame.
  2. Pay close attention to the top and bottom edges where water is most likely to pool or run down. Let it dry completely to achieve a 100% waterproof finish.
View full details

Passive Airflow Improvement. Reduce heat and moisture in your container

Professional Grade

Designed and tested for proper shipping container compatibility

Durability

Engineered for superior structural integrity and reliability

Professional Grade

Designed for professional shipping container applications

Weatherproof

Built to withstand rain, snow, heat, and harsh outdoor conditions

Convenience

Simple bolt-on or mount-on installation with minimal tools required

Improved Airflow

Promotes consistent airflow for improved container conditions

What Our Customers Say

  • Awana K.

    Fast shipping, well package, clear instructions. You can also look at video website/YouTube.

  • Kirk C.

    Installed both of these down low towards the back of the 40′ container. With the doors open, I can absolutely tell a huge difference in ventilation. Soon I will install a rooftop solar fan and not need to open the doors. The construction of these vents is top notch and with a little caulk to seal everything up, they should be good for a very long time. If you are going to use the pop rivets, which is recommended, get yourself a pop rivet tool that chucks in a drill. I have a high quality handheld tool, good grip strength, and it was very difficult. So get a good pop rivet tool.

  • Jackson W.

    These vents are very well made and easy to install using the supplied template.

  • Lisa S.

    Well worth the effort it takes to install these, no more rain IN the container from moisture!

  • Leo A.

    I used these before and they are great. This is the second time buying some

  • Joe W.

    These vents are very well made and easy to install using the supplied template.

  • Mert B.

    Vents arrived quickly and well packed in a box that was a perfect fit. Following the provided instructions and cut-out template, my husband selected which two sides to mount the vents. (One low and one high on opposite ends to get a good cross-flow of air.) He made one slight modification made to the vents which was to add fiberglass screen (like for screen doors) to help keep the container as bug-proof as possible. After marking the locations, he used an angle grinder and cut off wheel to make the openings. Drill (10) holes, add a bead of silicone sealant on each side, install the vent, and use the provided pop rivets to fasten in place. Finally, he added a bead of sealant around the entire frame (inside and out) to insure a weather tight installation. We are 100% satisfied with our purchase and this product. Being in the desert Southwest, these vents should reduce the heat build up inside our 40′ container.

  • Aaron C.

    Put 4 vents in cone. Building to try and get some air flow!! Sure is hot in this Texas heat!!

  • David P.

    Great product, perfect for my Conex container, this is a must have for condensation inside the container.

  • Daniel M.

    Awesome well built easy to install vents for shipping containers. Massive improvement in air flow.

  • Don B.

    I seen other C cans that where sweating inside, so far they seem to keep the ventilation up very well. Watch Youtube for information on the install, it made it very easy.

  • Garrett R.

    This is the second set of these vents I have installed in my 20′ sea crates. In the three years I have used the first crate, the temperature inside has never been a problem. This spring I got a second sea crate and immediately noticed that it was way warmer inside that my first one. I ordered the same vents and installed them today, a sunny warm day. Immediate difference inside. The temperature moderated fairly quickly. These are pretty expensive but are worth it. They are shipped quickly, are well packaged and have very good installation instructions.

  • Mike K.

    I had high expectations for the product based on price. I was not disappointed. The plastic inside and aluminum outside cover makes them very sturdy. They fit perfectly between the corrugated metal leaving enough room for the flange. I purchased 2 packages (4) and each package had an extra pop rivet. I used one full tube of silicone sealant for all 4 vents. I put a bead on both sides of the container over the holes I drilled and then the top and bottom of the vent. They should offer a tub of sealant for each package. That would make the kit 100 % ready to install.

  • Sloan W.

    It wasn’t too hard to install and works well for venting my air conditioner. It’s strong and attractive.

  • Jeff G.

    I bought the 45s with the screen and they installed perfectly. I took their advice and used the provided rivets. This side install was much better than cutting into the roof and risking roof leaks.

  • Zach H.

    Very well engineered product. Good quality materials, easy to install, keeps the bugs out.

  • Andrew M.

    If you're looking to protect equipment in a container shed, this is the vent to get.

1 of 17

Frequently Asked Questions

How do passive louvered vents work?

They let air flow naturally in and out of your container through angled louvers, with no fan and no moving parts. As air warms inside the container it moves toward the vents and escapes, while cooler outside air is drawn in, which reduces the trapped heat and humidity that cause condensation. Because there is nothing mechanical, there is nothing to power, wear out, or maintain.

Why do these come as a set of 2?

Ventilation works best when air has both a way in and a way out, so the vents are sold as a pair to set up that flow. Installing one vent low and one high (or on opposite ends) lets air circulate through the container rather than stagnate, which is far more effective than a single vent on its own.

Will louvered vents stop condensation in my container?

They significantly reduce it by giving moist, warm air a way to escape instead of condensing on the cold steel walls and ceiling. For mild conditions, passive vents like these are often enough. In hot or very humid climates, many owners pair them with an active vent, using the louvered vents as passive intake and a powered or solar vent as the exhaust, for stronger airflow.

Are the vents easy to install?

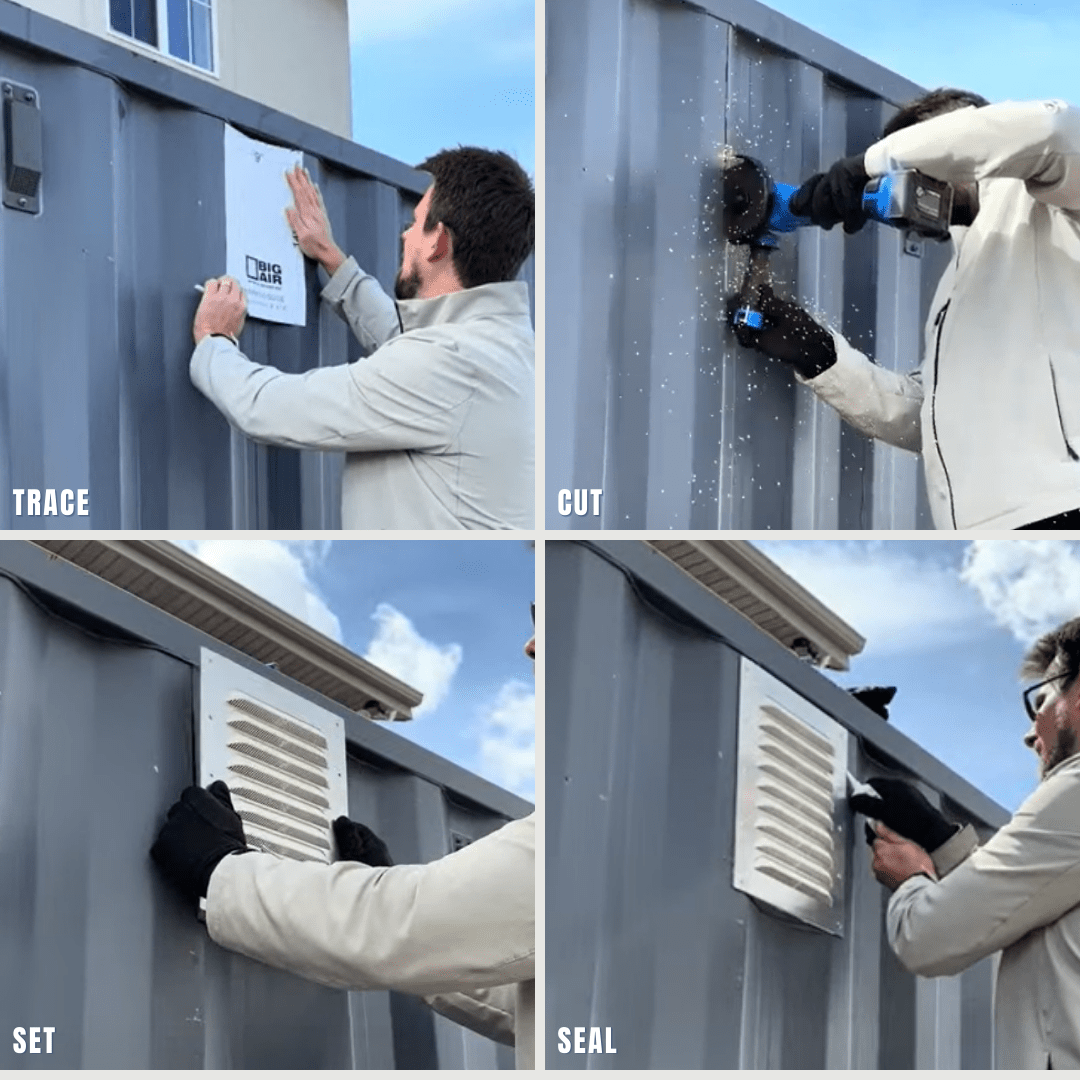
Yes, they are designed for easy DIY installation. The louvered design and rectangular shape are made to fit a shipping container, and with no wiring or moving parts involved, mounting them is a straightforward project you can handle yourself with basic tools.

Questions About Products?

Whether you need more details, have a specific use case in mind, or just want to make sure you're choosing the right accessory — submit your question below and a member of our team will get back to you shortly.