Skip to product information
1 of 2

Shipping Container Ventilation Kit: Louvered Intake Vents + Powered Exhaust Fan

Shipping Container Ventilation Kit: Louvered Intake Vents + Powered Exhaust Fan

Regular price $358.99 USD
Regular price $382.98 USD Sale price $358.99 USD
Sale Sold out
Andrew M.

If you're looking to protect equipment in a container shed, this is the vent to get.

SILVER VENTS ON BACK ORDER - PLEASE ALLOW 2-3 WEEKS FOR SHIPPING

Easy Shipping Container Installation

Container Condensation Reduction

Commercial-Grade Container Accessories

High-Airflow Ventilation Design

Solar-Powered Container Efficiency

Fit-Tested Container Design

Description

RECTANGULAR SILVER VENT IS ON BACK ORDER - PLEASE ALLOW 2-3 WEEKS FOR DELIVERY 


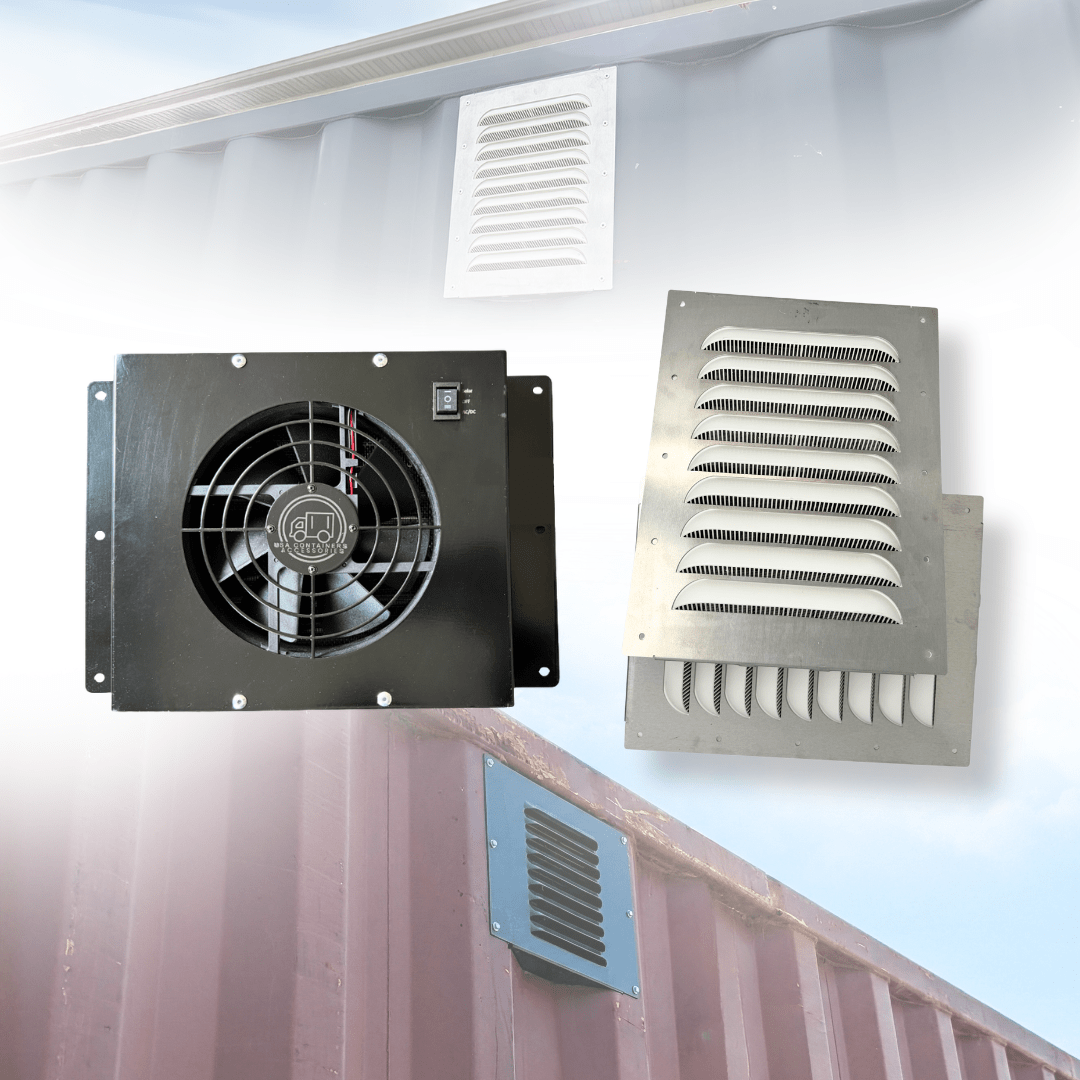
Stop condensation and heat with a complete container ventilation system, not just a single vent. This bundle pairs two passive louvered intake vents with a powered wall exhaust fan to create real cross-flow airflow inside your container: cool, fresh air is drawn in low through the louvered vents while the powered fan pushes hot, humid air out. That airflow loop is what actually prevents "container rain," protects stored goods, and keeps the interior usable in summer heat.

A single passive vent relies on the weather to move air. Adding a powered fan moves it on purpose, which is why this combination is far more effective in a sealed steel container than vents alone.

WHAT'S INCLUDED:
- 2 x Rectangular Louvered Gable Vents (passive intake, mount high to let fresh air in)
- 1 x Powered Wall Vent (active exhaust, choose your power option below)

CHOOSE YOUR POWERED FAN:
- Solar Powered: runs entirely on solar with no wiring and no electrician. The simplest option, ideal for off-grid containers and job sites.
- Multi-Powered: runs on solar and electric, so the fan keeps moving air at night and on cloudy days for continuous, all-conditions ventilation. Best where you have power access and want around-the-clock airflow.

WHY THIS BUNDLE:
- Complete intake-and-exhaust system in one purchase, no guesswork pairing parts
- Actively fights condensation, mold, and trapped heat
- Protects tools, inventory, and anything moisture-sensitive
- Straightforward DIY installation
- Buying the system together costs less than the pieces separately

Outfit your container with proper airflow from day one. Select Solar or Multi-Powered above and add the complete kit to your cart.

How to use

Step-by-Step Wall Vent Installation

Step 1: Trace the Cutout Template

  1. Position the exhaust vent on the exterior wall of the container. Line it up as high and as close to the roof as possible.
  2. Center the unit so that the side mounting edges align properly with the flat ribs (corrugations) of the container wall.
  3. Use a marker to draw a stencil/cut line around the perimeter of the vent body.
  4. Pro-Tip: The top and sides of this cut are straight, but tracing carefully around the overlapping profile of the container's metal ribs ensures a snug fit. It is better to cut slightly small, as you can grind it out later for a tighter fit.

Step 2: Cut out the Vent Opening

  1. SAFETY FIRST: Put on proper eye protection and heavy-duty work gloves before cutting into the steel.
  2. Use an angle grinder equipped with a metal cutting disc (cut-off wheel) to carefully cut along your traced template lines.
  3. Switch to a grinding disc to clean up any rough edges or burrs, and test-fit the vent until it slides into the cutout opening tightly.

Step 3: Mount and Secure the Vent

  1. Push the exhaust vent fully into the cutout opening so it sits flush against the container wall.
  2. Align the mounting holes with the flat sections of the container's corrugation.
  3. Using a power drill and heavy-duty self-tapping screws, drill directly through the vent frame and the container steel to lock the unit firmly in place. Tighten the screws until they are completely snug.

Step 4: Waterproof and Seal

  1. Step inside the container and inspect the installation layout. Check for any visible sunlight poking through the seams around the vent housing.
  2. CRITICAL STEP: To ensure the installation is entirely waterproof, apply a generous layer of standard exterior-grade silicone sealant or caulk around the exterior and interior seams of the vent to prevent rain or moisture from leaking in.

Step 5: Connect Power Source

  1. Select your preferred power method. You can plug the exhaust vent directly into an electrical cord, connect it to the included solar panel, or connect both simultaneously.
  2. System Tip: If you connect both, the integrated motor is smart enough to automatically select and draw from whichever power source is currently delivering the most energy.

Rectangular Vent Installation:

Step 1: Trace the Cutout Template

  1. Take the provided stencil and place it against the exterior wall of your shipping container at your desired location.
  2. Use a marker to trace clearly around the stencil lines to map out your cut area.

Step 2: Cut Out the Vent Opening

  1. SAFETY FIRST: Put on your protective gear (eye and hand protection) before operating heavy tools.
  2. Use an angle grinder equipped with a metal cutting disc (cut-off wheel) to carefully cut out the traced section of the container wall.
  3. Test-fit the louver gable vent by sliding it into the cutout hole. It should be a very snug fit to minimize the amount of sealing needed later.

Step 3: Drill the Mounting Holes

  1. Push the vent tightly into the cutout opening so it sits flush against the container wall.
  2. Using a power drill, drill matching holes directly through the pre-marked holes along the outer edge of the vent frame and straight through the container's steel skin.
  3. Drill all 10 mounting holes around the perimeter of the frame.

Step 4: Rivet the Vent to the Container

  1. Grab your rivet gun and the provided mounting hardware (pop rivets).
  2. Place a rivet into the gun, insert it into one of the drilled holes, and pop it into place.
  3. CRITICAL STEP: Firmly apply inward pressure against the vent frame while pulling each rivet. This compresses the vent's built-in waterproof lining against the steel wall, ensuring an airtight, heavy-duty contact seal.
  4. Repeat this process for all 10 holes until the vent is completely fastened.

Step 5: Seal for Waterproofing

  1. Take your silicone sealant/caulk and apply a clean bead completely around the exterior seams of the vent frame.
  2. Pay close attention to the top and bottom edges where water is most likely to pool or run down. Let it dry completely to achieve a 100% waterproof finish.
View full details

Stop condensation and heat

Convenience

Simple bolt-on or mount-on installation with minimal tools required

Moisture Reduction

Helps reduce interior moisture buildup, mold, and mildew risks

Professional Grade

Designed for professional shipping container applications

Improved Airflow

Promotes consistent airflow for improved container conditions

Solar Powered

Uses solar energy for reliable off-grid operation

Professional Grade

Designed and tested for proper shipping container compatibility

What Our Customers Say

  • Andrew M.

    If you're looking to protect equipment in a container shed, this is the vent to get.

  • Jeff G.

    I bought the 45s with the screen and they installed perfectly. I took their advice and used the provided rivets. This side install was much better than cutting into the roof and risking roof leaks.

  • Aaron C.

    Put 4 vents in cone. Building to try and get some air flow!! Sure is hot in this Texas heat!!

  • Mert B.

    Vents arrived quickly and well packed in a box that was a perfect fit. Following the provided instructions and cut-out template, my husband selected which two sides to mount the vents. (One low and one high on opposite ends to get a good cross-flow of air.) He made one slight modification made to the vents which was to add fiberglass screen (like for screen doors) to help keep the container as bug-proof as possible. After marking the locations, he used an angle grinder and cut off wheel to make the openings. Drill (10) holes, add a bead of silicone sealant on each side, install the vent, and use the provided pop rivets to fasten in place. Finally, he added a bead of sealant around the entire frame (inside and out) to insure a weather tight installation. We are 100% satisfied with our purchase and this product. Being in the desert Southwest, these vents should reduce the heat build up inside our 40′ container.

  • Mike K.

    I had high expectations for the product based on price. I was not disappointed. The plastic inside and aluminum outside cover makes them very sturdy. They fit perfectly between the corrugated metal leaving enough room for the flange. I purchased 2 packages (4) and each package had an extra pop rivet. I used one full tube of silicone sealant for all 4 vents. I put a bead on both sides of the container over the holes I drilled and then the top and bottom of the vent. They should offer a tub of sealant for each package. That would make the kit 100 % ready to install.

  • Daniel M.

    Awesome well built easy to install vents for shipping containers. Massive improvement in air flow.

1 of 6

Frequently Asked Questions

How is this different from passive vents alone?

Passive vents rely on natural airflow, but this kit adds a powered exhaust fan that moves air on purpose. The louvered vents act as intake, drawing fresh air in, while the powered wall fan actively pushes hot, humid air out. That creates real cross-flow airflow, which is far more effective at stopping condensation and heat in a sealed steel container than passive vents working on their own.

What's the difference between the solar and multi-powered options?

Both versions include the same louvered intake vents and a powered exhaust fan, the difference is how the fan is powered. The solar option runs entirely on solar with no wiring, which is ideal for off-grid containers and job sites. The multi-powered option runs on solar and electric, so the fan keeps moving air at night and on cloudy days for continuous, around-the-clock ventilation where you have power access.

What's included in the kit?

The kit pairs two louvered intake vents with one powered wall exhaust fan, giving you a complete intake-and-exhaust ventilation system in a single purchase. You choose the solar or multi-powered fan version above, the intake vents are the same in both. Buying the system together costs less than the pieces separately.

Will this stop condensation and heat in my container?

That is exactly what it is built for. By actively pulling humid, hot air out while drawing fresh air in, the kit attacks the trapped moisture and heat that cause "container rain" and make a container uncomfortable to use. The active airflow makes it well suited to humid climates and containers that hold moisture-sensitive items.

Questions About Products?

Whether you need more details, have a specific use case in mind, or just want to make sure you're choosing the right accessory — submit your question below and a member of our team will get back to you shortly.