Skip to product information
1 of 3

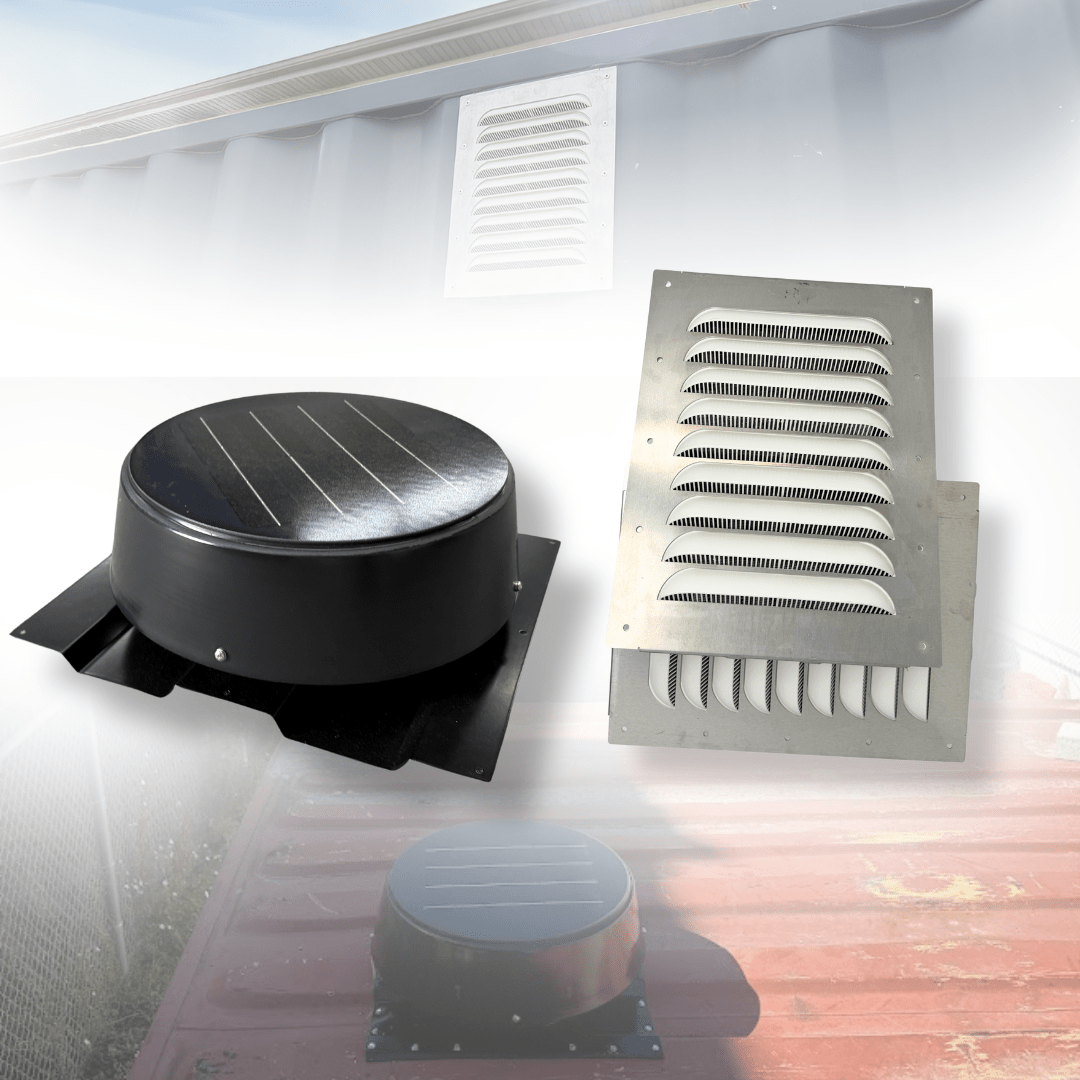
Ultimate Ventilation Bundle – Rectangular Louvered Side Vents (2-Pack) + 10W Solar Roof Vent

Ultimate Ventilation Bundle – Rectangular Louvered Side Vents (2-Pack) + 10W Solar Roof Vent

Regular price $419.99 USD
Regular price Sale price $419.99 USD
Sale Sold out
Case I.

Worked so well, now I want a second roof vent for the shipping container. This will help keep the heat from building up in your container and keep the air moving.

SILVER VENTS ON BACK ORDER - PLEASE ALLOW 2-3 WEEKS FOR SHIPPING

Fit-Tested Container Design

Easy Shipping Container Installation

Container Condensation Reduction

Corrosion-Resistant Steel Construction

High-Airflow Ventilation Design

Solar-Powered Container Efficiency

Description

RECTANGULAR SILVER VENT IS ON BACK ORDER - PLEASE ALLOW 2-3 WEEKS FOR DELIVERY 


Maximize airflow and protect your cargo with the Complete Container Ventilation Bundle—pairing two high-performance rectangular louvered side vents with a 10W solar-powered roof exhaust vent. Together, this combo creates an unmatched ventilation system: side vents pull in fresh air passively, while the solar fan continuously pushes out hot, humid air. Enjoy superior climate control and bundle savings versus buying each vent separately.

Key Features & Benefits

  • Dual Vent System – Side vents act as passive air inlets, while the solar roof vent actively exhausts heat and humidity.
  • Cargo Protection – Helps prevent condensation, mold, rust, and heat damage to stored goods and the container itself.
  • Durable Materials – Side vents feature UV-resistant polypropylene and aluminum frames; the solar vent is weatherproof and corrosion-resistant.
  • DIY-Friendly Installation – Side vents come with rivets, screws, and drill templates; the solar vent mounts leak-free with no wiring required.
  • Flexible Vent Placement – Side vents can be installed low or high on container walls or doors to optimize airflow.
  • Bundle Savings – Get a complete ventilation solution at a lower price than purchasing the vents individually.

Transform your container into a breathable, climate-controlled space with this ultimate ventilation bundle. The rectangular louvered side vents serve as fresh-air intakes, each providing 45 square inches of airflow. On the roof, the solar-powered vent continuously extracts heat and moisture, powered directly by sunlight—no electricity needed. Together, they create cross-flow ventilation that keeps your container cooler, drier, and odor-free.

How to use

10W Solar Powered Roof Vent Installation

1. Mark the hole

Place the foam gasket so that the circle is centered over a raised, flat rib on your container

Using the gasket as a stencil, trace a the inner circle using a marker to form your cut out shape 

Tip: Choose a spot on your container's roof that gets maximum sunlight throughout the day

2. Cut the hole

Using the cutting disc with your cut-off wheel tool, cut through the container following the shape you drew in previous step

Use grinding disk with cut-off wheel tool to smooth out any edges and even out your circular hole

Tip: Watch out for flying sparks / metal shavings!

Using the cutting disc with your cut-off wheel tool, cut through the container following the shape you drew in previous step

Use grinding disk with cut-off wheel tool to smooth out any edges and even out your circular hole

Tip: Watch out for flying sparks / metal shavings!

3. Place your foam gasket

Place your foam gasket over the hole you've cut and cover it with the 10W Solar Powered Shipping Container Roof Vent.

4. Mount the vent

Using either the included self tapping screws or rivets, secure the vent to the container roof. 

Using self-tapping screws will require some down ward force to get them to catch and screw into the thick container steel

Using rivets, you will need to pre-drill holes through the container roof to insert the rivets into

Fasten chosen hardware to secure the vent to the container roof, creating a water tight seal

5. Optional: Apply additional silicone based sealant to seams and hardware to increase water resistance

That's it! Once the solar panel receives sunlight, your fan will start spinning, pulling out excess heat and moisture from your container! 

Rectangular Vents Installation

Step 1: Trace the Cutout Template

  1. Take the provided stencil and place it against the exterior wall of your shipping container at your desired location.
  2. Use a marker to trace clearly around the stencil lines to map out your cut area.

Step 2: Cut Out the Vent Opening

  1. SAFETY FIRST: Put on your protective gear (eye and hand protection) before operating heavy tools.
  2. Use an angle grinder equipped with a metal cutting disc (cut-off wheel) to carefully cut out the traced section of the container wall.
  3. Test-fit the louver gable vent by sliding it into the cutout hole. It should be a very snug fit to minimize the amount of sealing needed later.

Step 3: Drill the Mounting Holes

  1. Push the vent tightly into the cutout opening so it sits flush against the container wall.
  2. Using a power drill, drill matching holes directly through the pre-marked holes along the outer edge of the vent frame and straight through the container's steel skin.
  3. Drill all 10 mounting holes around the perimeter of the frame.

Step 4: Rivet the Vent to the Container

  1. Grab your rivet gun and the provided mounting hardware (pop rivets).
  2. Place a rivet into the gun, insert it into one of the drilled holes, and pop it into place.
  3. CRITICAL STEP: Firmly apply inward pressure against the vent frame while pulling each rivet. This compresses the vent's built-in waterproof lining against the steel wall, ensuring an airtight, heavy-duty contact seal.
  4. Repeat this process for all 10 holes until the vent is completely fastened.

Step 5: Seal for Waterproofing

  1. Take your silicone sealant/caulk and apply a clean bead completely around the exterior seams of the vent frame.
  2. Pay close attention to the top and bottom edges where water is most likely to pool or run down. Let it dry completely to achieve a 100% waterproof finish.
View full details

Eliminate Container Heat and Condensation With This Complete Solution

Professional Grade

Designed and tested for proper shipping container compatibility

Convenience

Simple bolt-on or mount-on installation with minimal tools required

Moisture Reduction

Helps reduce interior moisture buildup, mold, and mildew risks

Built to Last

Durable materials help resist rust and long-term outdoor wear

Improved Airflow

Promotes consistent airflow for improved container conditions

Solar Powered

Uses solar energy for reliable off-grid operation

What Our Customers Say

  • Case I.

    Worked so well, now I want a second roof vent for the shipping container. This will help keep the heat from building up in your container and keep the air moving.

  • Jeff G.

    I bought the 45s with the screen and they installed perfectly. I took their advice and used the provided rivets. This side install was much better than cutting into the roof and risking roof leaks.

  • Frank B.

    Fast delivery, easy to follow installation guide lines, great ventilation for my container…Thanks

  • Don B.

    I seen other C cans that where sweating inside, so far they seem to keep the ventilation up very well. Watch Youtube for information on the install, it made it very easy.

  • Daniel M.

    Awesome well built easy to install vents for shipping containers. Massive improvement in air flow.

1 of 5

Frequently Asked Questions

How does this ventilation bundle work?

It creates a complete airflow loop in your container. The two rectangular louvered side vents bring fresh air in passively, while the solar-powered roof vent pulls hot, stale air out from up top. That intake-and-exhaust combination moves air through the whole container, which is far more effective at fighting heat and condensation than a single vent working on its own.

Why do I need both side vents and a roof vent?

Air needs both a way in and a way out to actually circulate. The low side vents act as the intake and the roof vent acts as the exhaust, so warm, humid air rises and is drawn out the top while cooler fresh air is pulled in below. Using only one or the other limits airflow, pairing them is what gives you true cross-ventilation and stops the "container rain" that ruins stored goods.

Does the solar vent need any wiring or power?

No. The roof vent is solar-powered, so it runs on its own built-in solar panel with no wiring, no electrician, and no power hookup. That makes the whole bundle easy to install on an off-grid container or a remote site, the side vents are passive and the roof vent powers itself.

Will this bundle fit my container?

Yes. The solar roof vent is designed specifically to fit Conex container roofs with 3.5 inch ribs, and the louvered side vents install into the container walls, so the bundle is built for standard shipping containers. For placement, the side vents go low to draw air in and the roof vent goes up top to exhaust it.

Questions About Products?

Whether you need more details, have a specific use case in mind, or just want to make sure you're choosing the right accessory — submit your question below and a member of our team will get back to you shortly.