Skip to product information
1 of 1

Shipping Container Essentials Kit: Must-Have Starter Accessories

Shipping Container Essentials Kit: Must-Have Starter Accessories

Regular price $299.99 USD
Regular price Sale price $299.99 USD
Sale Sold out
Marcus G.

I love that this kit uses real customer buying patterns because it truly includes the exact interior essentials you need.

In stock. Fast free shipping delivered in 2-5 business days

No Electrical Wiring Required

Complete Project Solution

High-Strength Construction

Purpose-Built for Containers

Protects Against Theft

Commercial-Grade Container Accessories

Description

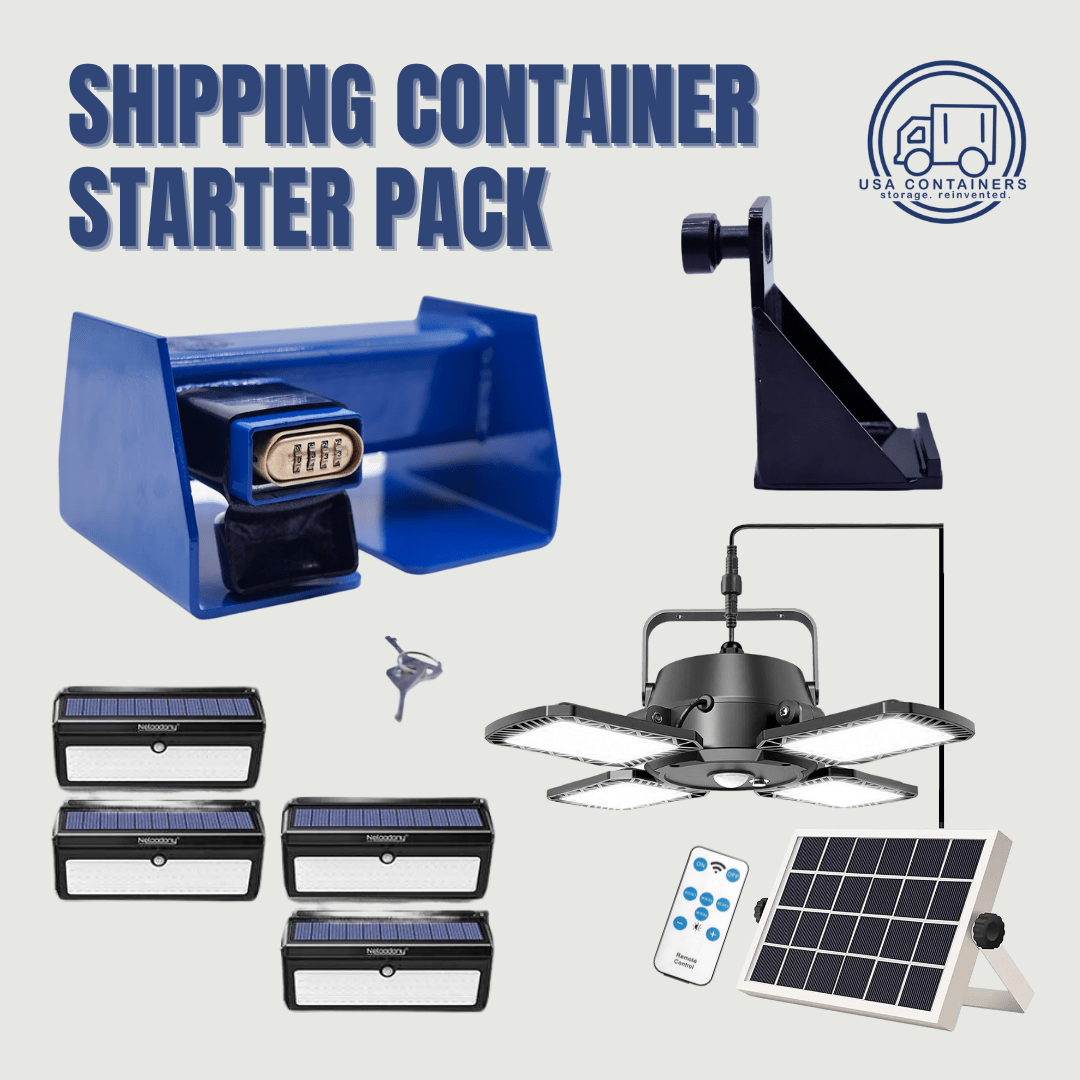
Everything You Need to Protect, Light, and Secure Your Container (Bundle & Save)

The ultimate bundle every shipping container owner needs — designed to protect your investment, improve functionality, and save you money.

Owning a shipping container comes with a unique set of challenges: tough doors, security, leveling, and poor lighting. The Shipping Container Essentials Starter Pack is your all-in-one solution, thoughtfully curated to solve these common problems — while saving you money compared to purchasing each item separately.

This Bundle Includes 4 Best-Selling Products:

  • 4-Pack Ultra-Bright Solar-Powered Exterior Motion Lights
    Light up your container surroundings with ease. These solar-powered, motion-activated lights install in minutes and provide powerful illumination—perfect for added security and convenience at night.
    View product details
  • Interior Solar-Powered Fan-Shaped Light
    Brighten up your container interior with this ultra-efficient solar light. Fan-style design spreads light evenly—no wiring required. Perfect for dark storage containers or workspaces.
    View product details
  • Heavy-Duty Shipping Container Door Bar Lock System
    Protect your valuables with this industrial-grade lock bar system designed specifically for shipping container doors. Deters thieves and provides unbeatable peace of mind.
    View product details
  • Storage Container Leveler & Booster
    Lift and Level your shipping container with ease! These heavy-duty levelers prevent hard to open doors by ensuring your container is level and your doors are aligned
    View product details

Bundle & Save:

This Essentials Pack costs less than purchasing each product individually — making it the smartest way to protect and upgrade your container. Whether you're using your container for storage, a workshop, or a tiny home, this kit provides everything you need to secure, light, and protect it for years to come.

Order your Shipping Container Essentials Starter Pack today and save!

Why Every Container Owner Needs This Bundle:

  • Protects Against Theft
  • Enhances Lighting and Visibility — Inside & Out
  • Extends the Life of Your Shipping Container
  • Saves You Money — Buy as a bundle and get an instant discount vs. buying separately
  • Easy DIY Install — No special tools or wiring required


How to use

Door Bar Lock System Installation Guide

Determine an easy access location to install the Cargo Door Lock. Installation can be in a manner so you can slide it up the locking bars to unlock.

  1. Separate the two halves of the Cargo Door Lock aligning them so the lock mechanism and holes are both facing downward.
  2. Separate the two halves of the Cargo Door Lock by sliding them away from each other removing them from the door.
  3. Slide the two halves together by inserting the smaller tube into the larger tube.
  4. Secure the Cargo Door Lock as tight as possible on both doors’ locking arms and depress the locking button with key removed or turn dials. NOTE: Minor adjustments may be made to align the locking pin and holes.
  5. Your Cargo Door Lock is properly installed. Secure your keys in a safe location.

How to reset your code: Combination Lock Only

To open the lock for the first time: SET the combination to 0-0-0-0. DEPRESS the shackle and PULL open.

To set your own combination: (Remember: Combination can only be set when the lock is open)

  1. INSERT “reset tool" (enclosed in package) in hole inside of lock.
  2. PUSH key in and TURN 90 degrees in either direction.(key automatically stays in this position). Failure to exert force while pushing the key in will result in a failed attempt to set or re-set combination.
  3. While pressing down on the shackle inside the lock chamber, SET wheels to desired combination, be sure to set wheels precisely on numbers.
  4. TURN and remove reset tool, Lock in now set to new 4 digit combination, Be sure to record your secret combination.

To Lock: SCRAMBLE the wheels and CLOSE the shackle.

Lifting Bracket Usage Guide

Step-by-Step Instructions

Step 1: Set Up a Solid Base

  1. Inspect the ground surface below the corner casting of your shipping container.
  2. CRITICAL STEP: If you are working on dirt, gravel, or grass, place a heavy-duty wooden block, timber sole plate, or 2x12 leveling pad flat on the ground. Never place the jack directly on raw soil—the immense weight of the container will sink the jack right into the earth instead of lifting the structure.

Step 2: Lock the Leveler Bracket Into the Cornerstone

  1. Insert your leveling booster bracket directly into the side or front opening of the container's lower corner casting.
  2. Turn or flip the bracket to engage its twist-lock mechanism so it sits completely flat and physically locked inside the casting.

Step 3: Position the Bottle Jack

  1. Position your 6-ton or 12-ton hydraulic bottle jack directly underneath the exposed lifting lip of the leveler bracket.
  2. Ensure the steel lifting saddle on top of the jack ram lines up perfectly with the bracket’s integrated safety ridge to prevent the jack from slipping out under pressure.
  3. Turn the jack’s extension screw counter-clockwise by hand to raise it until it tightly contacts the bracket, maximizing your initial lifting range.

Step 4: Lift and Adjust

  1. Insert the pump handle into the side receiver of the bottle jack and turn the release valve fully clockwise to seal the hydraulic valve.
  2. Pump the handle using smooth, steady strokes to raise the container corner to your desired working height.
  3. Pro-Tip: The built-in bypass system automatically protects the internal mechanism against ram over-travel. Once elevated, slide your wooden shims or railroad ties under the container frame before slowly opening the release valve to lower it onto its new level foundation.


Fan-Shaped Light Installation

Step 1: Mount the Solar Panel

  1. Head to the outside of your container and choose a spot on the roof or high up on the side wall that gets unobstructed, direct sunlight all day long.
  2. Use the included mounting hardware to secure the exterior solar panel bracket to the container's steel skin.
  3. Attach the solar panel to the bracket so it faces upward toward the sun for optimal daily charging.

Step 2: Route the Power Cable

  1. Drill a small pass-through hole into the side wall or roof of your container right near your solar panel.
  2. Feed the attached power wire from the solar panel down through the hole and into the interior of the container.
  3. CRITICAL STEP: To keep your container 100% waterproof, apply a generous bead of exterior-grade silicone sealant completely around the drilled hole to block out rain and morning condensation.

Step 3: Hang the Fan-Shaped Light

  1. Step inside the container and pick a central location on the ceiling or structural ribs to maximize your light coverage.
  2. Use the included mounting bracket to hang the fan-shaped lighting fixture flush to the ceiling.
  3. Plug the solar panel's drop-down wire directly into the receiver socket on the light fixture.
  4. Pro-Tip: While designed as an indoor overhead light, the rugged design means you can also mount this fixture on the outside of your container to illuminate an outdoor loading area if you prefer.


Solar Powered Lights Installation

Step 1: Choose Your Mounting Location

  1. Select a high position on either the top or the outer sides of your shipping container.
  2. Choose a spot that receives direct, unobstructed sunlight during the day so the integrated solar panel can charge fully.

Step 2: Mount the Security Light

  1. Position the light flat against the container surface at your chosen location, ensuring the solar panel on top faces upward.
  2. Secure the unit to the container wall using the mounting hardware.
  3. Pro-Tip: Placing these lights right above the door handles or at the top corners of the container provides the best angle for motion detection and maximizes area illumination at night.

Step 3: Let the Unit Charge

  1. Leave the light exposed to direct sunlight for a full day cycle before initial use to ensure the internal battery charges completely.
  2. The unit is fully self-contained, meaning there are no external wires to run or holes to drill into your container.
View full details

Must-Have For Every Container Owner

No Wiring Required

Installs without running power cables or hiring an electrician.

Bundle

The parts you need for your shipping container project

Durability

Engineered for superior structural integrity and reliability

Container Corrugation Compatible

Designed to match container corrugation and structural contours

Security

Provides powerful protection against theft and unauthorized access

Professional Grade

Designed for professional shipping container applications

What Our Customers Say

  • Marcus G.

    I love that this kit uses real customer buying patterns because it truly includes the exact interior essentials you need.

  • Nick C.

    Product works great easy to lock up container.

  • Raul G.

    Needed something for my container. Easy to install with perfect lighting. Highly recommended.

  • Paul P.

    Worked perfect made leveling container very easy with a 10 ton bottle jack

  • Travis B.

    The combination of interior and exterior solar lighting provides incredible visibility at night without needing any electrical wiring.

  • Nicole R.

    The heavy-duty door bar lock system is completely solid, and the motion-activated exterior lights work flawlessly to keep our storage site safe.

1 of 6

Questions About Products?

Whether you need more details, have a specific use case in mind, or just want to make sure you're choosing the right accessory — submit your question below and a member of our team will get back to you shortly.